Saturday 23 April 2022

Power Automate Convert SharePoint List Items to Modern Pages By Sabeeh

 Convert Bulk Custom list data to Modern Page using Power Automate


Automation to Create Modern Pages

Custom List Entry
Power Automate Created Page


Scenarios Problem:

1: Creating manual pages takes time, entry in custom list will save your time to create page.

2: Like if you migrated content from SharePoint on premises custom list to SharePoint online and you want to convert this list data to modern pages experience. So you are right article.

Perquisites:

Following are very basic steps as perquisites:

1: Create a list with desired columns so data can be converted to Modern page.

2: Create Page template in modern view

3: Create Power automate to get data from list and create Modern page as per page template.

Step 1: Create a Custom List

Columns depends on the data you want to map on Template I created Features, Potential user cases and Point of contact. List Name: Posts

SharePoint list fields

Step 2: Create a Template

Now create a new page in SitePages this page will be utilized as Benchmark to map list data. PageTemplate.aspx I have created.

Enter Placeholders using text editor so we can search these where list column should mapped. You can add as many you want I have added 3 only.

·         [**ListColumn 1**]

·         [**ListColumn 2**]

·         [**ListColumn 3**]

Final Look of Template PageTemplate.aspx:


Final Look of Template


When we edit the SharePoint page and publish a request sent in background. This request we can find in Network tab by following below points:

1.       Go to template page we created (PageTemplate.aspx)

2.       Press F12 for Developer tool

3.       Go to Network tab

4.       Edit this template page and publish it

5.       In Network call there will be a action SavePage like below

Developer tool to get Response


Step 3: Click on view source:

Right click here and click show more then copy the complete content.

Copy Page Response

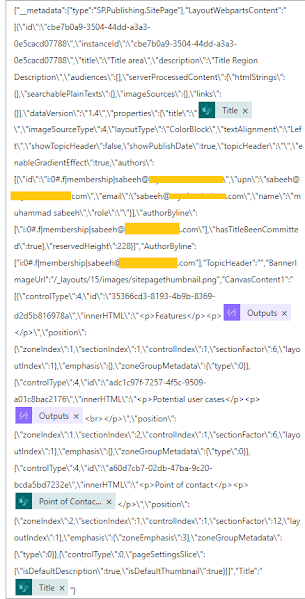
Paste your content inside visual studio code and search for listcolumn we will use below content in Power automate to create new page and map content with listcolumn fields.

Visual studio code replace Column placeholder

Step 4: Create the Power Automate

  • Power Automate Action On Item Creation

Create a Power automate on top of custom SharePoint list we created at step 1 on item creation (Post List).

Power Automate Action

  • Copy Template.aspx as New Page:

Now we have to copy PageTemplate.aspx to use as new page. To create new page using template there is Rest endpoint call CopyTo. We will use custom list title as new page name in URI field like below.

/_api/web/getfilebyserverrelativeurl(‘/sites/SitePages/PageTemplate.aspx’)/copyto(‘/sites/SitePages/@{triggerBody()?[‘Title’]}.aspx’)

CopyTo Action to Create New Page

  • Checkout newly created Page:

After above action new page will be created in sitepages. But to modify we have to check out this page after making changes we will check in again. To achieve this we need Page ID there is action in power automate Get file metadata like below but make sure you replaced forward slash with %2f


Check Out newly created Page

Using get file metadata we have Page ID to check out the page we have to run another send an http request like below using CheckOutPage action:

_api/sitepages/pages(@{body(‘Get_file_metadata’)?[‘ItemId’]})/CheckOutPage         


Page Checkout action

  • Compose Action to Replace Spaces

Note: if you have multiline columns in custom list we created above there are chances of line breaks but json only understand </br> tag for line breaks. To convert line breaks to </br> we have to compose action and URI component. Our list is having 2 multi lines text columns so we have to use 2 Compose like below:

Compose 1:

uriComponentToString(replace(uriComponent(triggerBody()?[‘Features’]), ‘%0A’, ‘</br>’))

Compose 2:

uriComponentToString(replace(uriComponent(triggerBody()?[‘Potentialusercases’]), ‘%0A’, ‘</br>’))


Compose to remove spaces

  • Draft Page Action:

By creating 3rd HTTP request to SharePoint we can save page as draft using below URI:

_api/sitepages/pages(@{body(‘Get_file_metadata’)?[‘ItemId’]})/savepageasdraft

In this part we will add response by copying from visual studio or from Response body browser developer tool. Paste this response in Body of http request action and search ListColumn and Page title. Replace page title with title from When an item created action.

Paste Response From Visual studio or Developer Tool


Draft Page Call

Now search ListColumn and replace multiple columns with Compose outputs.

Features= outputs(‘Compose’)

Potential user cases = outputs(‘Compose_2’)

Point of contact = @{triggerOutputs()?['body/PointofContact/Email']} (from item creation action)


Following is final look after modifications:


  • Publish Page

Once done with changes create another http request to publish the page.
Publish Newly created page Action


Now just save your Power Automate and create new entry in SharePoint Custom list.

Summary Total Actions


Thank for reading this article I hope this helps you. if you stuck somewhere please feel free to reach me in comments or through email: SabeeSharif@gmail.com

#SharingIsCaring #SharePointEnvrionment #PowerPlatform #SharePointOnline #ProblemSolution #PowerPlatfromLearning #SharePointLearning


Thursday 7 May 2020

9: Steps to Uninstall Spfx WebPart/Extension from Site

Before we deployed Spfx Extension Using CDN Configuration.


9.1: Steps to Uninstall Spfx WebPart/Extension from Site

Note: To uninstall Spfx webpart/Extension whatever you are removing you have to delete from recycle bins. First stage Recycle Bin and Second Stage Recycle Bin.
Let's Remove Extension:

1: First Go to site contents: click on your app and select remove

2: It will take you to Classic SharePoint screen, remove from here as well.

3: Remove from all recycle bins second level as well


Go to Second Level Recycle Bin: Site Settings -> Recycle Bin -> Second-stage recycle bin


Delete this file from here as well.


4: Go to your Public CDN from the document library remove the 3 files


5: Go to your site contents from ShareApps catalog delete the file and delete from recycle bins as well

After removing from here just click on Exit Class Experience


Go to Apps for SharePoint(Site Contents):


Select your app and Delete this:


Delete from Recycle Bin as well. Site Settings -> Recycle Bin -> Select Your app and delete

Don’t forget to delete from Second-storage recycle bin as well.

Finally your app is uninstalled. 

Follow these steps: How to Install Spfx Extension.

Thanks Best Of Luck. If you stuck somewhere please feel free to ask in Comment. #SharingIsCaring 


8: App catalog missing from SharePoint Modern site content

Before we deployed our spfx extension. Extension Deployment

8.1: App catalog missing from SharePoint Modern site content

If by default Apps For SharePoint is not available you have to perform following steps:


1: Run SharePoint Online Management Shell


2: Connect with your site by editing url like this:
https://<SiteCollectionName>-admin.sharepoint.com
Example: https://sabeehsharif-admin.sharepoint.com

3: Run this command:
$site = Get-SPOSite <SiteCollectionUrl>
Example: $site = Get-SPOSite https://sabeehsharif.sharepoint.com/

4: Run this command:
Add-SPOSiteCollectionAppCatalog -Site $site

5: Now go and verify your site content


Here you can upload your .sppkg package of SharePoint spfx.


Next 9: Steps to Uninstall Spfx WebPart/Extension from Site

Thanks Best Of Luck. If you stuck somewhere please feel free to ask in Comment. #SharingIsCaring 

7: Deployment of Extension/WebPart to CDN without debug mode


As in point 6 we have configured CDN, now we will upload binaries our extension. If you didn't configure CDN please follow this: CDN Configuration for Extension deployment


7.1: Changes Required in spfx extension code before Deployment
1: Update the CDN path in write-manifests.json

2: Final Change in elements.xml we are making change this file because once our extension deployed we don’t want to pass properties as query string:


Modified Elements.xml as per our extension:

Set properties than these properties will be passed from here no need to pass via query string.
<?xml version="1.0" encoding="utf-8"?>
<Elements xmlns="http://schemas.microsoft.com/sharepoint/">
    <CustomAction
        Title="ModifyOtbApplicationCustomizer"
        Location="ClientSideExtension.ApplicationCustomizer"
        ClientSideComponentId="5b595d7e-c3cd-407f-9ca8-91c3bfe50080"
        ClientSideComponentProperties="{&quot;cssurl&quot;:&quot;/SiteAssets/customcss.css&quot;,
        &quot;Bottom&quot;:&quot;Follow us on:&quot;,
        &quot;Logo&quot;:&quot;/SiteAssets/FooterImages/LinkedIn.png&quot;,
        &quot;testMessage&quot;:&quot;Test message&quot;}">
    </CustomAction>
</Elements>

For your Reference:

3: Run this command: gulp bundle –ship

This command will generate file on this path:
..\Temp -> deploy -> copy these files and paste in CDN folder

4: Upload These files in CDN Library we created during CDN Configuration:

5: Run this Command: gulp package-solution –ship
This command will generate .sppkg

Go to this path ..\sharepoint\solution

Upload this file to: App Catalog (Site Contents -> Apps for SharePoint)
Follow steps defined here: If Apps for SharePoint is Missing: Solution


Next upload your .sppkg to and Click on Deploy

Now go to Add an App

Here you will get your Newly uploaded App just click on this app will install:

Installing app:


After this refresh the page you will see your changes without query string
Hurry your app is running without debug mode:

If SharePoint apps catalog is missing here is a Solution. Follow these steps to

Next Generate SharePoint Apps Library


Thanks Best Of Luck. If you stuck somewhere please feel free to ask in Comment. #SharingIsCaring 

Wednesday 6 May 2020

6: Configuration Of CDN to deploy Spfx Extension

Before we completed to get DOM elements without using SharePoint Designer.

Now we are going to configure CDN:

6.1 Introduction of CDN and Types

Content Delivery Network (CDN) is a place where you can place common files like assets style sheets, Js files, Json, jpeg, ping etc. Expose these files so applications like SharePoint spfx webpart or extensions can get files from this location.
CDN have 2 types:
                A: Private CDN (Used to apply high level permissions)
                B: Public CDN (Files used by SPFX web parts can only utilize the Public CDN and clientSideAssets folder)
For Details: https://docs.microsoft.com/en-us/office365/enterprise/use-office-365-cdn-with-spo

6.2: Steps to create SharePoint CDN site

1: Create site collection with teamsite and create document library to save fileshttps://portal.office.com/adminportal/home#/homepage

Open this site collection: 


2: Now create Document library where we will upload files to treat as CDN files.

6.3: PowerShell Commands to enable CDN for Document Library

1: Connect to SharePoint Online using:  https://<sitename>-admin.sharepoint.com
      Connect-SPOService –Url https://sabeesharif-admin.sharepoint.com

2: Command to check CDN is already enabled on this site or not
      Get-SPOTenantCdnEnabled –CdnType Public
if its false run following command:
      Set-SPOTenantCdnEnabled -CdnType Public
It will take 15 minutes to enable public CDN keep checking using until, it shows True
      Get-SPOTenantCdnOrigins -CdnType Public

3: Add newly created library to CDN using following command (path of our document library)
     Add-SPOTenantCdnOrigin -CdnType Public –OriginUrl sites/cdn/documentlibraryName
Again it will take 15 mins to apply


Keep checking until Pending status removed using following command:
     Get-SPOTenantCdnOrigins -CdnType Public

6.4: Provision of unsupported files for CDN using PowerShell

First let’s check by default supported files

1: Let’s check CDN supported files extensions by default:
      Get-SPOTenantCdnPolicies -CdnType Public 


2: We got scenario in which we have to get .txt and .js files as well so there is a PowerShell command to provision these extensions in CDN. On your Desktop create one file with .txt and one with .js extension and upload to this CDN document library


Upload these files In Document library:


3: Let’s try to access js file using browser: Modify URL like below:

4: On Browser you will get Access denied because these files are not publically accessible only you can get using Spfx or by passing token using Postman. So only valid users can access these files


6.5: Test CDN Configurations using Postman

1: Now open Postman to check these files are accessible outside or not. You have to pass Referer as header in.


2: Now let’s give it try to access .txt file: This file is not accessible because we didn’t register .txt extension in our CDN policies


3: To check registered policies: as you can see txt file is missing

4: Register new extension txt in CDN Policies:
Run this command:
Set-SPOTenantCdnPolicy -CdnType Public -PolicyType IncludeFileExtensions -PolicyValue "CSS,EOT,G
IF,ICOJPEG,JPG,JS,MAP,PNG,SVG,TTF,WOFF,TXT"


5: Now try to access .txt file using postman, will be accessible.
6: Finally, CDN Configuration completed.


Now time to upload our binaries of extension to CDN.

Next 7: Deployment of Extension/WebPart to CDN withoutdebug mode


Thanks Best Of Luck. If you stuck somewhere please feel free to ask in Comment. #SharingIsCaring